

Contents:
- Building a Job
- Ontology Configuration
- Test Questions
- Monitoring and Reviewing Results
- Using Bulk Select
- Groups
- Pre-labeling
Our image transcription tool allows users to combine image annotation and transcription in one job, simplifying their workflow.
Building a Job
Data
This tools accepts images and PDF files (single and multipage) for annotation. If using our OCR assistance feature, images must be CORS configured to allow predictions to be made on the text. PDF files must also be CORS configured in order to be supported. Please view our Guide to CORS configuring an s3 bucket for assistance.
CML
Currently, there is no Graphical Editor support for this tool. Here is sample CML to build the job:
<cml:image_transcription type="['box']" source-data="{{image_url}}" validates="required" ontology="true" name="annotation" label="Annotate this image" crosshair="true" box-threshold="0.7" class-threshold="0.7" />
Parameters
Below are the parameters available for the job design.
-
type(required)-
The shape used in the job; currently ‘box’ and 'polygon'
-
N-sided polygon annotation type is now supported, use
polygon-max-verticesto specify the maximum number of vertices allowed.type="['polygon']" polygon-max-vertices="7"
-
-
source-data(required)-
The column from your source data that contains the image or PDF file URLs to be annotated.
-
-
disable_image_boundaries: allows shapes to be drawn outside the image boundary-
when
disable_image_boundaries="true"shapes can be dragged outside the image boundaries and the output will contain negative values - the default setting for
disable_image_boundariesis "false"
-
when
-
name(required)- The results header where annotations will be stored.
-
label(required)- The question label contributors will see.
-
validates(optional)- Whether or not this element is required to be answered.
- Accepts ‘required’
- Defaults to not required if not present
-
ontology(optional)- The list of classes to be labeled in an image - view this article to learn how to create your custom ontology.
- Accepts a boolean
- Defaults to ‘false’ if not present
-
review-data(optional)-
This will read in existing annotations on an image. The format must match the output shown below. The following is required:
-
'
id'- A randomly-generated, 32-character UUID
-
'
class’- The class from the ontology
-
'
type’-
This is the shape type, which is ‘box' or 'polygon’
-
-
'
instance’
- The shape class instance, which loads in the ontology sidebar
-
'
coordinates’-
The coordinates for the bounding box or polygon
-
-
'
metadata'-
'
shapeTranscription'-
This includes the following:
-
‘
inputType’- For transcription, this will always be ‘text’
-
‘
text’-
This is the transcription for the box or polygon
-
-
‘
type’-
This is the shape type, which is ‘box' or 'polygon’
-
-
‘
-
This includes the following:
-
'
-
Example:
-
-
[
   {
       "id": "677706c8-f405-4a2c-9be1-1b6f4c5042a2",
       "class": "Business Name",
       "instance": 1,
       "metadata": {
            "shapeTranscription": {
                  "inputType": "text",
                  "text":"Figure Eight"
                   }
          },
        "type": "box",
        "coordinates": { "x": 250,"y": 177,"w": 26,"h": 15 }
    }
]
-
-
-
Obs: Old metadata format is still supported for using in review-data
-
Shape with old metadata example:
-
[{"id":"677706c8-f405-4a2c-9be1-1b6f4c5042a2","class":"Business Name",
"instance":1,"metadata":[{"inputType":"text","text":"Figure Eight"}],
"type":"box","coordinates":{"x":250,"y":177,"w":26,"h":15}}]
-
-
Shape with old metadata example:
-
'
-
This will read in existing annotations on an image. The format must match the output shown below. The following is required:
-
box-threshold(optional)- The minimum overall bounding box IoU required for a contributor to pass a test question.
- Accepts a decimal value between 0.1 and 0.99.
-
class-threshold(optional)- The minimum percentage of correct classes applied to boxes in a test question for a contributor to be considered correct.
- Accepts a decimal value between 0.1 and 0.99.
- The formula is classes correct / (total classes correct + incorrect).
- Example: the
class-thresholdis set to 0.7 and a test question contains 10 ground truth boxes. A contributor gets 8 out of 10 classes correct for a score of 80% and would be considered correct for that test question.
-
crosshair(optional)
- Will enable crosshair location indication
- Accepts a boolean
- Defaults to ‘false’ if not present
-
ocr(optional)- When set to 'true', this enables OCR transcription assistance in the tool.
- This feature must be enabled for your team for access and is not included in every subscription plan; please contact your Customer Success Manager or Account Executive for more information.
-
output-format(optional)-
For supporting multipage PDF,
output-format="url"is required. -
Otherwise, accepts ‘json’ or ‘url’.
-
If ‘json’, the report column containing contributors' annotation data contains the annotation data in string JSON format.
-
If ‘url’, the report column containing contributors' annotation data contains links to files. Each file contains annotation data for a single data row in JSON format.
-
Defaults to 'json'.
-
-
allow-image-rotation(optional)- Accepts
trueorfalse - If
true, contributors can rotate the image within the image annotation tool. Contributors click a toolbar icon to turn on a rotation slider that can be used to adjust rotation angle from 0 to 359 degrees. The degrees rotated are exported in theimageRotationfield. This feature is only compatible with export optionoutput-format=url; this attribute must be added to the job cml before launch. Test questions and aggregation are not currently available for this annotation mode. - If
false, contributors cannot rotate the image. - Defaults to
falseif attribute not present.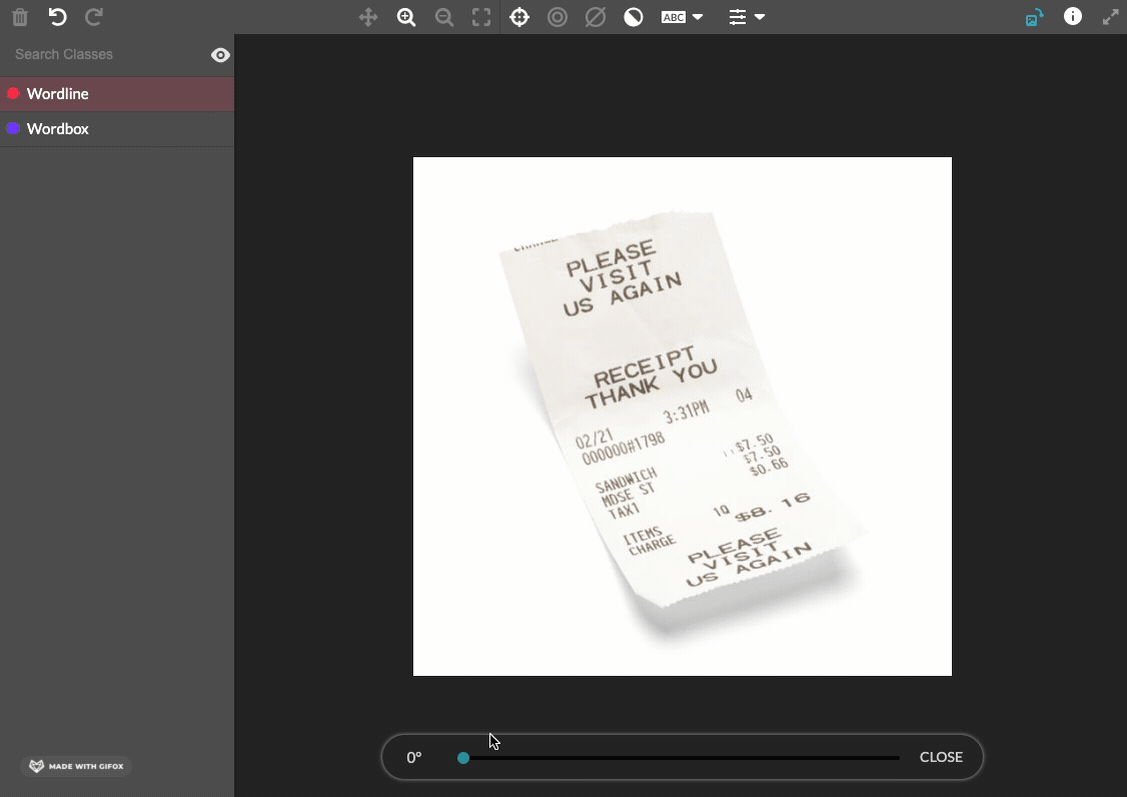
- Accepts
-
allow-box-rotation(optional)-
Will enable bounding boxes to be rotatable
-
Accepts 'true' or 'false'
-
Defaults to ‘false’ if not present
-
-
require-transcription-review(optional)-
Requires contributors to review every bounding box. Typically used in a QA/Peer review job to ensure QA contributor is verifying every bounding box created from work task.
-
Only available in jobs that require data to be reviewed; thus, requires review-from to be configured
-
Accepts 'true' or 'false'
-
Defaults to ‘false’ if not present
-
-
language(optional)-
This can only be used when
ocr="true" - Accepts a liquid variable; the column in your source data must contain an ISO 639-1 code
-
The supported languages and their codes are the following:
- '
af': 'Afrikaans', 'ar': 'Arabic', 'cs': 'Czech', 'da': 'Danish', 'de': 'German', 'en': 'English', 'el': 'Greek', 'es': 'Spanish', 'fi': 'Finnish', 'fr': 'French', 'ga': 'Irish', 'he': 'Hebrew', 'hi': 'Hindi', 'hu': 'Hungarian', 'id': 'Indonesian', 'id': 'Italian', 'jp: 'Japanese', 'ko': 'Korean', 'nn': 'Norwegian', 'nl': 'Dutch', 'pl': 'Polish', 'pt': 'Portugese', 'ro': 'Romanian', 'ru': 'Russian', 'sv': 'Swedish', 'th': 'Thai', 'tr': 'Turkish', 'zh': 'Chinese', 'vi':'Vietnamese', 'zh-sim': 'Chinese (Simplified)', 'zh-tra': 'Chinese (Traditional)'
- '
- If an invalid or unsupported ISO code is passed in from the source data, the in-tool OCR will default to English and will not recognize non-English letters or diacritics.
- Also supports right-to-left languages.
-
-
task-type(optional)- Please set task-type=”qa” when designing a review or QA job. This parameter needs to be used in conjunction with review-data . See this article for more details.
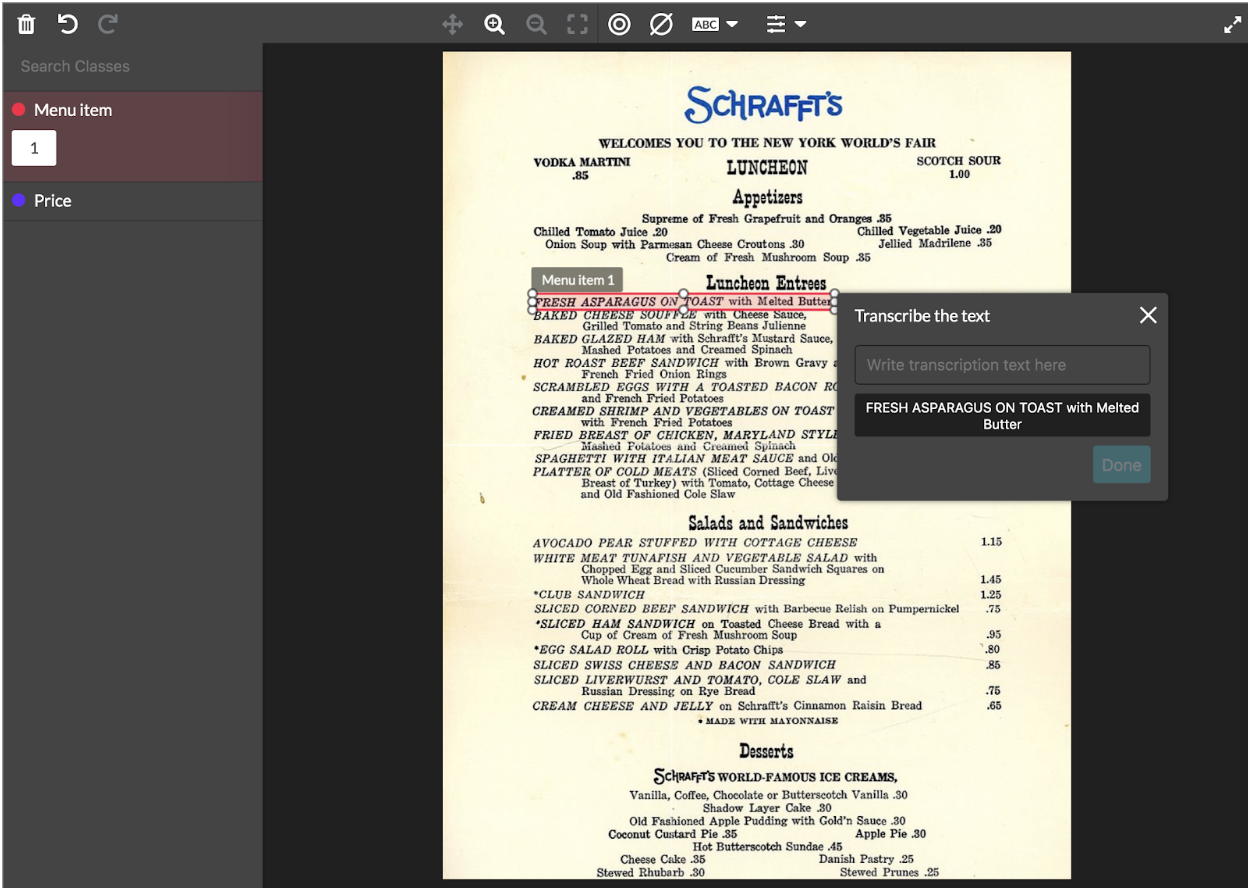
Fig. 1: Example of the image transcription tool built-in CML via Unit Page
Ontology Configuration
Note: Test Questions, Aggregation and Pre-labelling are yet not fully supported for ‘polygon’ type of shape
The image transcription tool supports ontologies. In addition, validators can be configured for each class in order to:
A) limit the number of shape instances contributors can create in that class
B) limit the text characters contributors can use when creating transcriptions in that class
Validators can be configured in the class configuration modal on the ontology manager page under “Transcription Settings”.
The following validators are available:
-
Date
-
Only valid dates can be submitted
-
Date format returned is YYYY-MM-DD
-
-
Alpha
-
Only letter characters can be submitted
-
Additional options include character number limitations and the ability to allow symbols and whitespaces
-
-
AlphaNum
-
Only letter or number characters can be submitted
-
Additional options include character number limitations and the ability to allow symbols and whitespaces
-
-
Numeric
-
Only float numbers with a single dot can be submitted
-
Additional options include character number limitations and the ability to allow symbols
-
-
Digit
-
Only integers can be submitted
-
Additional options include character number limitations and the ability to allow symbols
-
-
Custom Regex Validator
- Users can now specify text-based validations using Regex for each class individually in the ontology manager for image transcription.
- Shape Type Limiter
- Limit which shapes can be used with certain classes
- Limit which shapes can be used with certain classes
- Min/Max instance quantity
- Configure ontologies with instance limits
- Comes with the ability to mark the class as not present for long tail scenarios. This information will be added to the output as well.
- Configure ontologies with instance limits
-
Customizable Hotkeys
- Hotkeys can be assigned to classes by the user. Hotkeys cannot conflict with any other browser or tool shortcuts.
Test Questions
Creating Test Questions
In BETA, test questions are only partially supported. You may test on the boxes and the classes, but not the transcriptions.
- On the Quality Page, click 'Create Test Questions'.
- Add boxes around the text in the way specified in the job's instructions.
- If no annotations are needed, make sure the job includes an option, such as a single checkbox, to hide the annotation tool.
- Save the test question.
Reviewing Test Questions
- Select a test question from the Quality Page.
- From the image annotation sidebar, click 'Find a Judgment' and choose a contributor ID from the drop-down menu.
-
Edit, create or remove the test question annotations based on the feedback. Judgments are color-coded based on if they match the gold responses.
- Each box will have its own matching metrics, which can be seen by hovering over a contributor judgment or golden shape. A notification will appear in the top left corner of the image. A score from zero to one is displayed on the intersection over union formula. If using an ontology, the class match is also displayed.
- All scores on images are averaged and compared to the test question threshold set in the job design. The overall matching score is then displayed in the left sidebar of the tool.
- Save any edits that are made to update the evaluation of the existing contributors' work and ensure any future attempts to answer the test question will be properly evaluated.
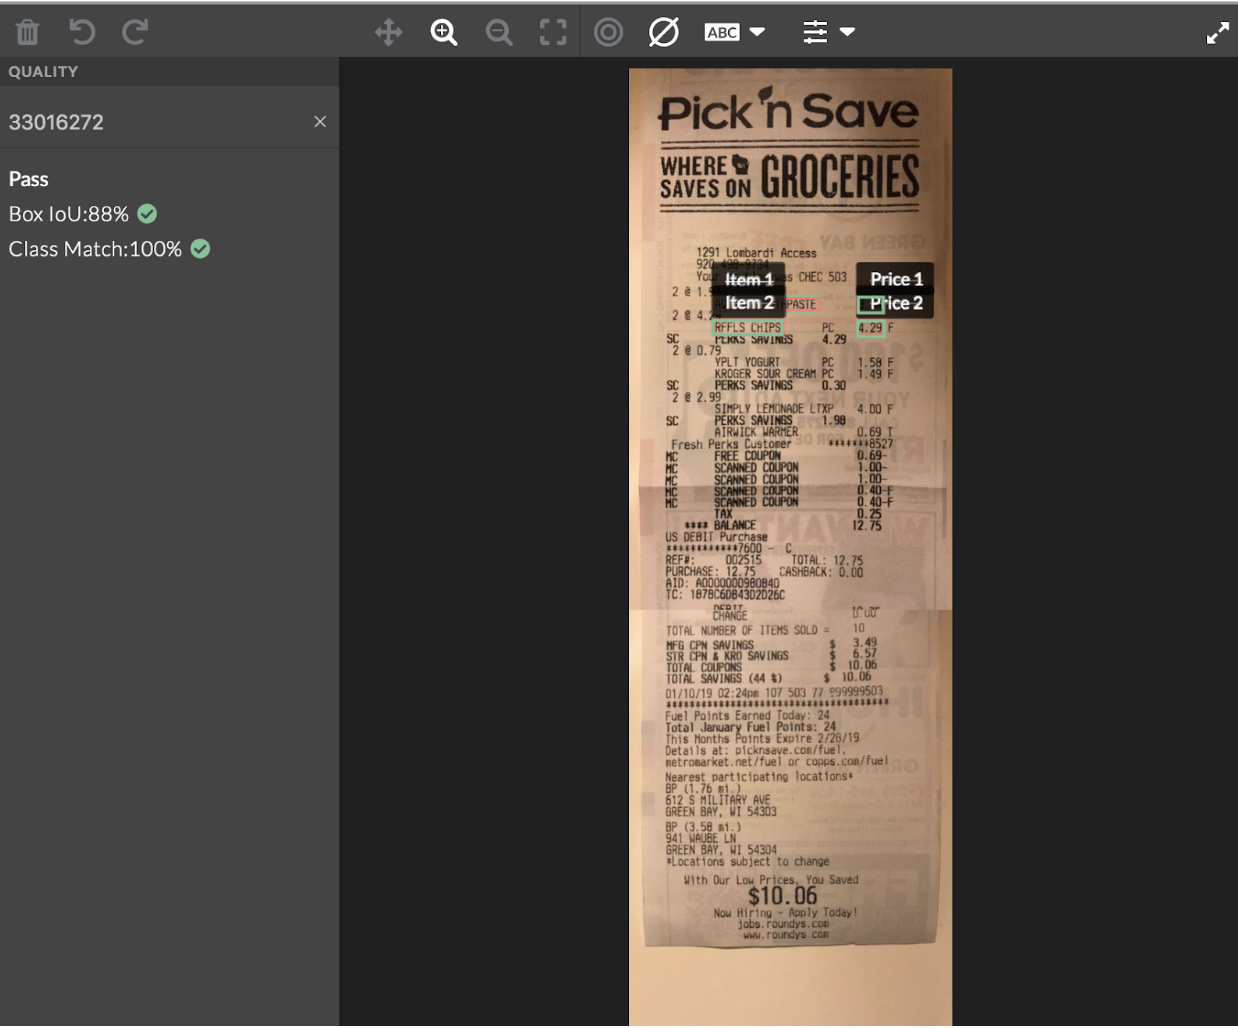
Fig. 2: Reviewing Test Question Judgments
Monitoring and Reviewing Results
As this is a BETA feature, aggregation is not supported. Jobs should be run either to a trusted partner or in a peer review workflow. To set that up, you simply use the review-from parameter outlined above.
Results
Reviewing Results
To review the results of your job, you can either use our Quality Audit feature (recommended), or the following:
- Go to the Data page.
- Click on a unit ID.
- In the sidebar of the annotation tool, select an option from the drop-down menu.
- You’ll see different contributor IDs, which allow you to view individual annotations.
- Click on a box or polygon to view its transcription.
Example output from an Image Transcription job
{
 "ableToAnnotate": true,
 "imageRotation": 0,
 "groups": [],
 "annotation": {
  "pages": {
   "1": {
    "shapesInstances": {
     "4db2c949-23bf-4fdd-b9ba-d0e84628e58f": {
      "visible": true,
      "x": 121,
      "y": 991,
      "height": 50,
      "width": 188,
      "angle": 0,
      "coordinates": { "x": 121, "y": 991, "w": 188, "h": 50 },
      "metadata": {
       "shapeTranscription": {
        "label": "Transcription",
        "modelType": "ocr",
        "modelDataType": "block",
        "inputType": "text",
        "annotatedBy": "machine",
        "text": "some text"
       }
      }
     }
    }
   }
 },
  "shapes": {
   "4db2c949-23bf-4fdd-b9ba-d0e84628e58f": {
    "id": "4db2c949-23bf-4fdd-b9ba-d0e84628e58f",
    "number": 1,
    "color": "#00B0FF",
    "pageNumber": 1,
    "type": "box",
    "class": "Car"
   }
  }
 }
}
ableToAnnotate : A boolean value indicating whether the contributor is allowed to annotate the image or not.
imageRotation: An integer value representing the angle of rotation of the image in degrees.
groups: An array containing the groups associated with the annotation.
-
id: A unique identifier for the group.
-
class: The class of the annotation group.
-
shapes: an array of shape IDs that belong to the group.
-
number: the number of shapes in the group.
annotation: It contains information about the annotations made on the image in an array.
pages: An object that represents each page of the image, if it has multiple pages and contains information about the shapes and their instances. In this example, there is only one page.
shapes: an object that represents each shape on the image, where each shape has a unique ID and the following attributes:
-
id: a unique identifier for the shape.
-
number: the number of the shape.
-
color: the color of the shape.
-
pageNumber: the page number where the shape is located.
-
type: the type of shape (in this case, a "box").
-
class: the class of the shape (in this case, "Car").
shapesInstances: Within the "pages" object, there is an object shape that represents instances of each shape on the image, where each shape instance has a unique ID and the following attributes:
-
visible: a boolean value that indicates whether the shape is visible or not
-
x: the x-coordinate of the shape instance
-
y: the y-coordinate of the shape instance
-
height: the height of the shape, for instance
-
width: the width of the shape, for instance
-
angle: the rotation angle of the shape for instance
-
coordinates: an object that represents the coordinates of the shape, for instance, where "x" and "y" are the top-left corner coordinates and "w" and "h" are the width and height of the shape for instance, respectively.
-
metadata: an object that contains additional metadata about the shape instance, such as transcription information. In this example, there is a "shape Transcription" attribute that contains information about the text transcribed by a machine.
Using Multipage PDF
When a multipage PDF is used as the source data, the tool will automatically transition to multipage mode, which will affect the output. The output format is as follows:
{
  ableToAnnotate: true | false,
  annotation: {
    shapes: {
      [shapeId]: { category, report_value, type } // Static properties of shapes
    },
    groups: { // Groups related properties
    }
    pages: {
      [pageId]: {
        shapesInstances: {
          [shapeId: { x.y.w.h. annotated_by, metadata } // Dynamic properties of shapes
        }
      }
    },
  }
}
It should be noted that output-format=url is required to allow multipage PDFs.
Using Bulk Select
This feature improves the work efficiency by allowing the user to select and edit (moving or deleting) many shapes at once. It can be done by holding SHIFT and drawing or clicking. Then, they all can be deleted or moved.
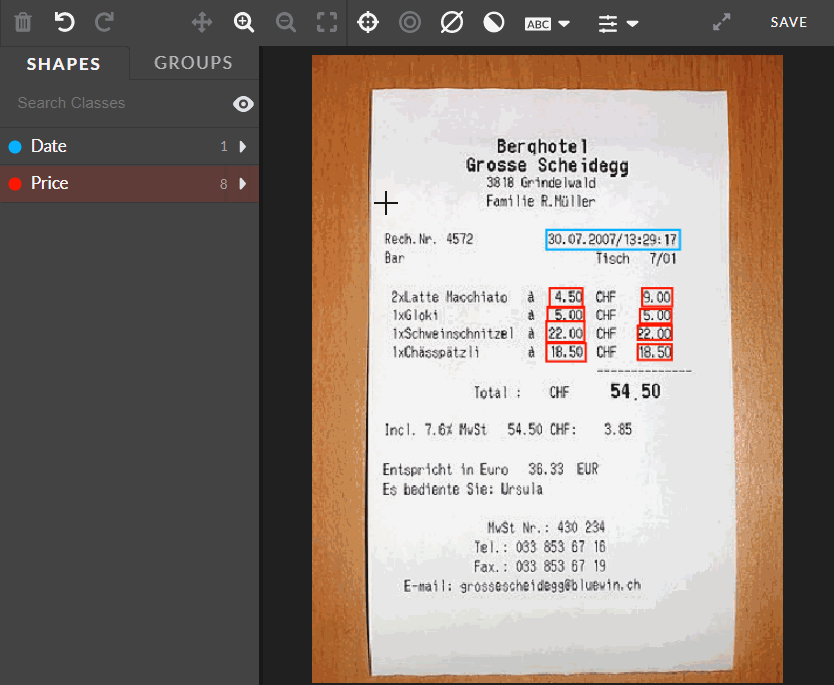
Fig.: Selecting many shapes by using bulk select
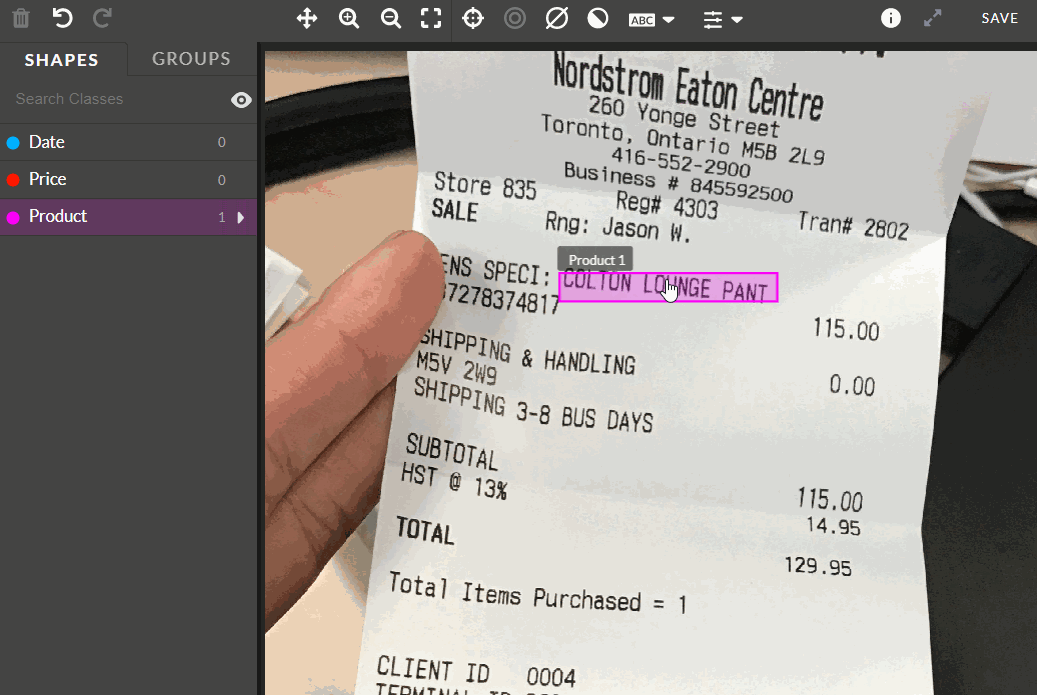
Groups
Annotating with Groups
With the groups feature, the user can create group shapes by using classes already defined for each job.
Defining the grouping classes
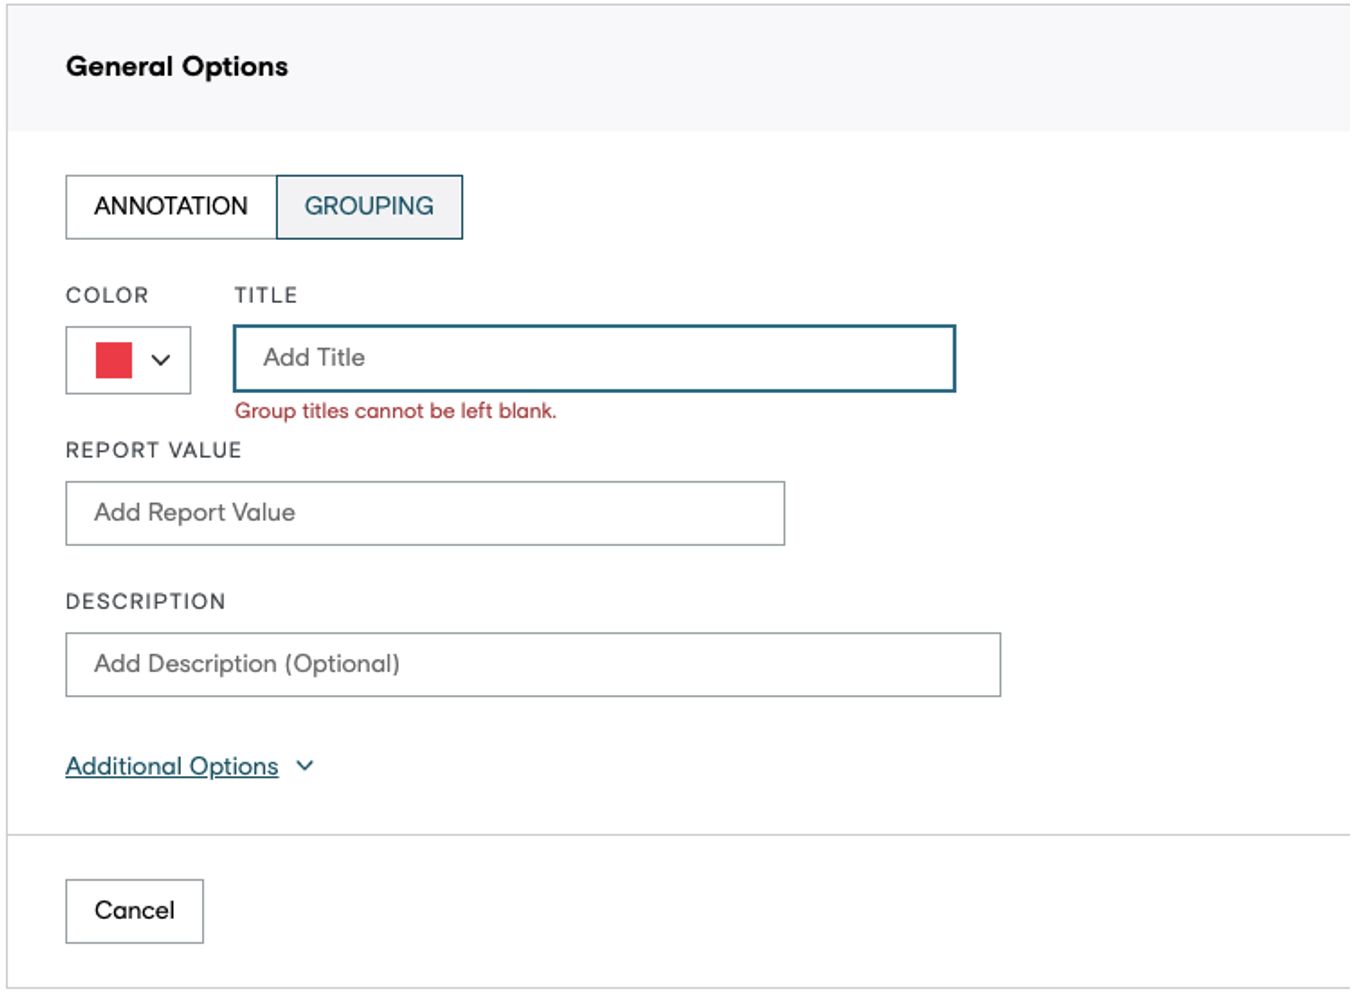
On the Design / Ontology Manager page, the job designer can create a class for groups by selecting GROUPING in the toggle. When creating a grouping class, it is needed to define a title and a color. The class description and report value are optional fields.
The groups tab
When the job is configured with grouping classes, a tab named “GROUPS” will appear along with the “SHAPES” tab. When the latter is selected, the annotation shapes mode is enabled, and the tool behaves as usual.
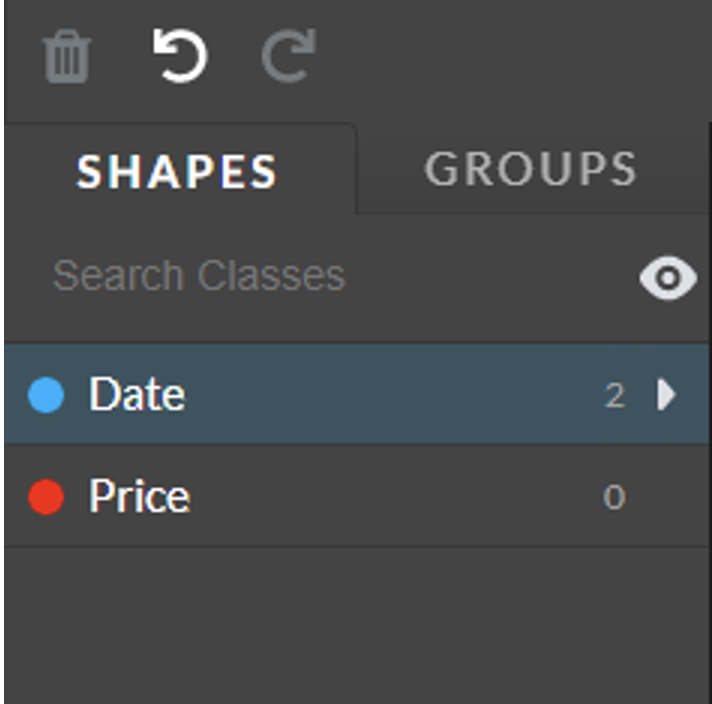
Fig.: Image Transcription Tool sidebar with SHAPES tab toggled
By toggling the “GROUPS” tab, the grouping mode is enabled. The sidebar will show the group classes available for the job.
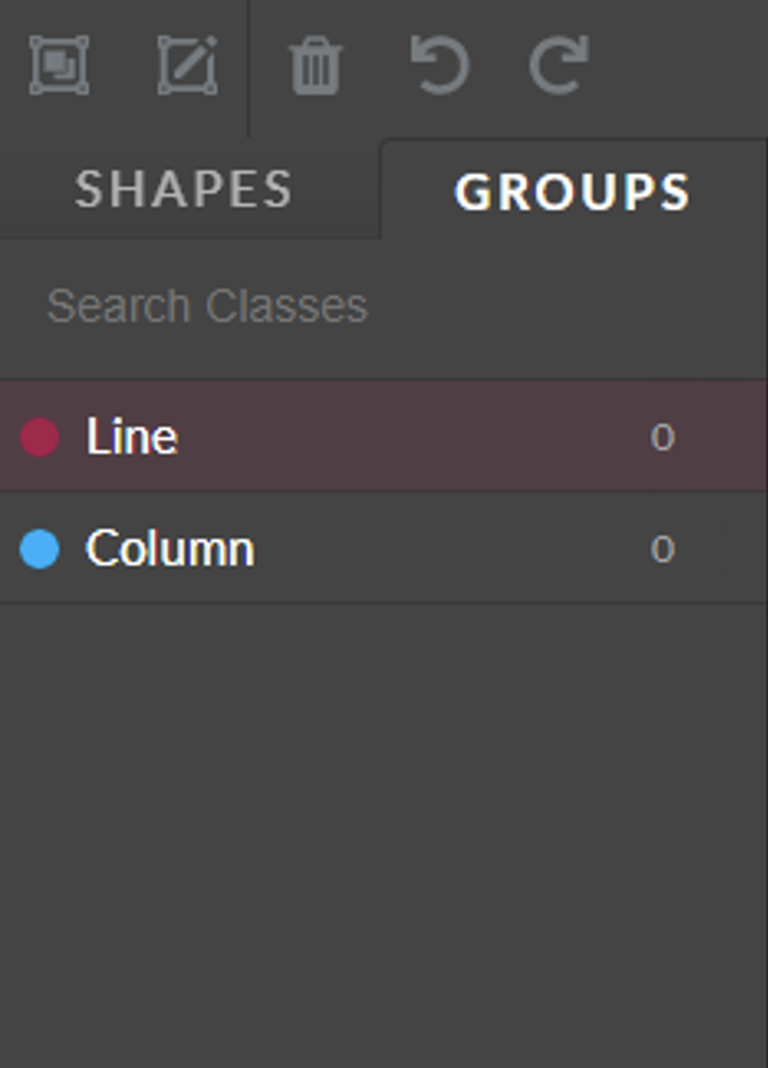
Fig.: Image Transcription Tool sidebar with GROUPS tab toggled
Creating a group
With one of the group classes selected, the user can bulk select shapes (by holding SHIFT and selecting multiple shapes) and click on the grouping icon (cmd/ctrl + G) to create a group for the selected class.
Fig.: Selecting many shapes by using bulk select
Editing a group
To edit a group, the user needs to click on the edit group icon in the toolbar. Once enabled, the group editing mode allows the user to add/remove shapes from the group by holding SHIFT and selecting/unselecting shapes.
Fig.: Editing group by clicking on the edit group icon
To remove a shape from a group, the user can also click on the ᐅ icon on the group class to view the group instances of that class. Then, by hovering/selecting the shape on the sidebar, click on the minus symbol to remove it from the group.
Fig.: Removing a shape from the group by clicking on the minus icon
If a group has less than two shapes, the group is deleted.
Deleting a group
There are two ways to delete a group:
- By selecting a group and clicking on the trash icon on the toolbar.
- Or by clicking on the trash icon on the group accordion on the sidebar.
Fig.: Deleting a group
Pre-Labelling
Pre-labelling dramatically improves the ability to obtain high-quality image transcriptions efficiently.
When the user draws a box around a line of text, the Pre-Labelling model will automatically assign individual boxes to each word in that line. Then, the OCR model will predict and transcribe each word. Currently supported in thirty-one languages.
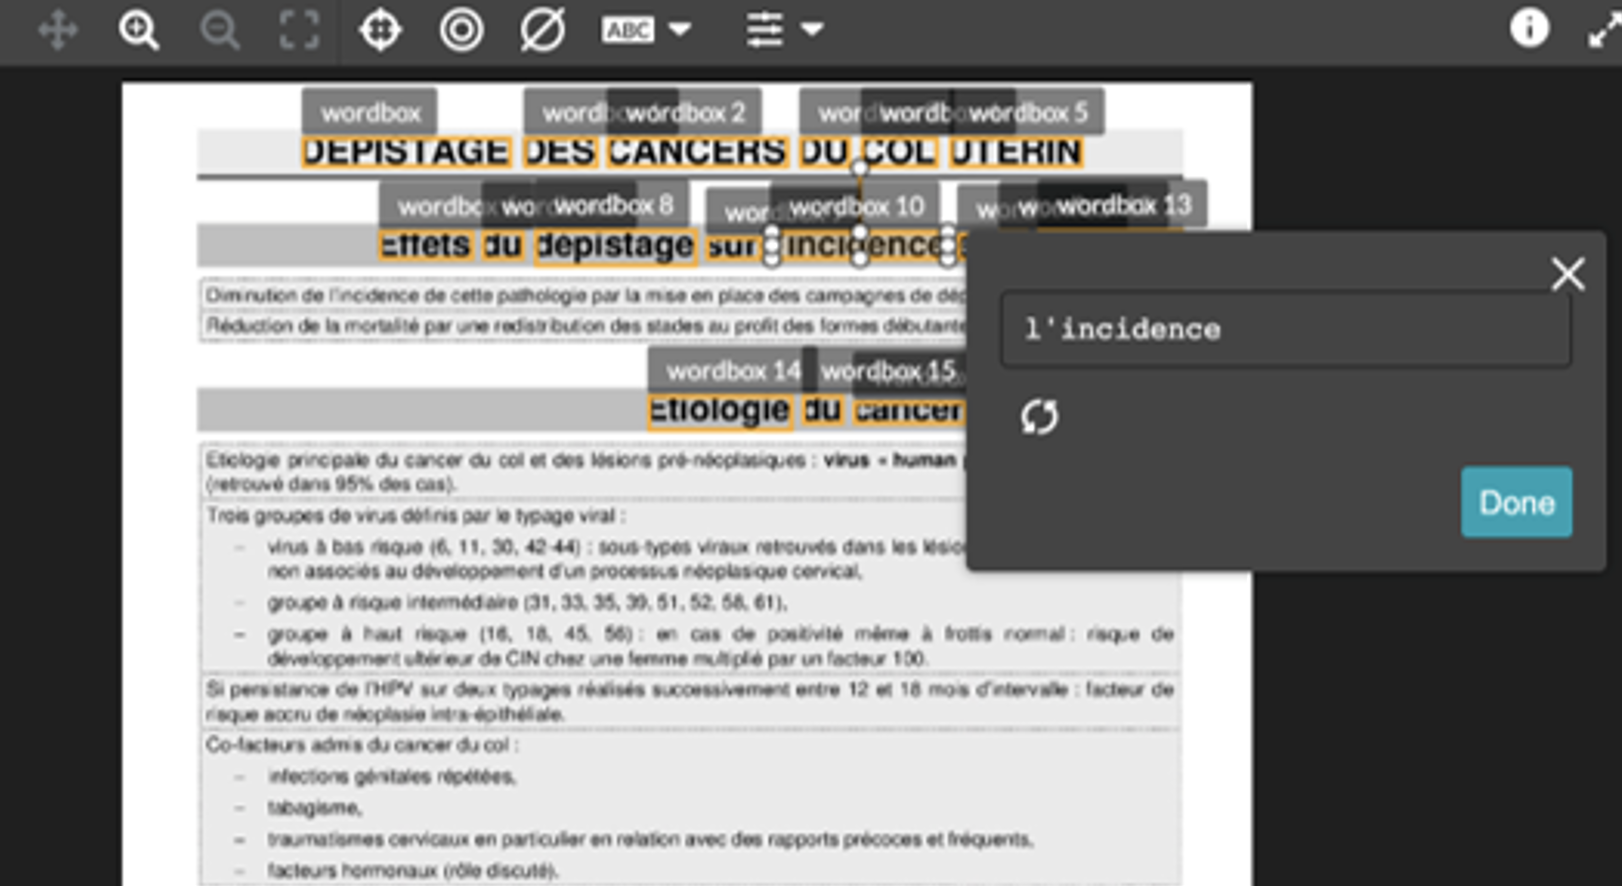
Fig.: Example of the pre-labelling feature